

-2.png)
Hey folks, Phil Zito here and welcome back. In this post, we are going to be talking about programming, specifically, we're going to be talking about design patterns. We’ll start off by just kind of discussing what design patterns are and a design pattern approach to programming. It's probably different than some of the things you've seen in the past. Then we are going to give a couple of sample design patterns.
Okay, so maybe you've heard of the concept, design patterns, in the past, maybe you have not. My experience with people learning to program has often been to go memorize blocks, look at existing programs, try to figure out how these programs are working, tweak and edit the programs and hope they still work, and eventually, it'll just click. That's essentially what you're taught.
If you go to most training programs, they're going to give you the pretty much same example every time. It's going to be, you've got a boiler with two pumps, maybe it's a chiller with two pumps, an air handler with a fan, and a cooling valve, heating valve, and a damper and you have to write this program. It's usually literally to follow the steps, follow the exact examples, and folks leave not really understanding how to program. They understand the tool, they understand kind of the logic blocks, and they understand where to find the logic blocks. Outside of that, they don't really understand the programming.
So, how do we get to a point where people can understand intuitively how to program? If you look at anything in life, it is almost always pattern driven. If you think about how you do something, whether it's building a house, whether it's building a bench, sewing a costume for your kids, whatever it is, there are patterns. If you're able to identify these patterns, then you're able to learn to easily, in this case program, in those cases, build a bench, build house, sew a costume, whatever.
So, how do we develop patterns for our programming? The first thing, obviously, is we have to have an understanding of HVAC. If you want to be able to, for example, take an analog enabled pattern, then you need to understand why you would use an analog enabled pattern. So, the first thing we want to cover here is, what's an example of a pattern, and we're start with the analog enabled pattern.
So, the analog enabled pattern you use all the time in building automation. The analog enabled pattern is, if outside air goes greater than x, enable the chiller; if outside air is less than x, enable the economizer; if outside air is less than x, enable the boiler. These are very common patterns. We see them in almost all sequence logic.
So, how do we do that pattern? Well, we're going to demonstrate this pattern on this software right here. This pattern is going to be the enabled pattern.

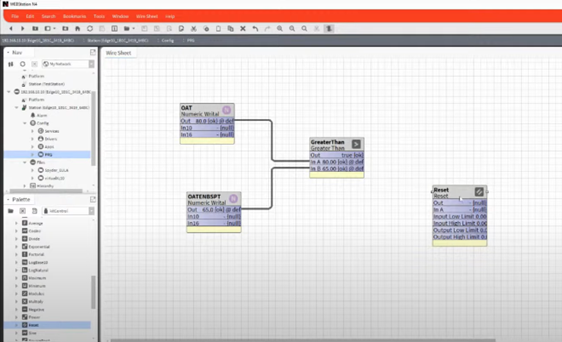
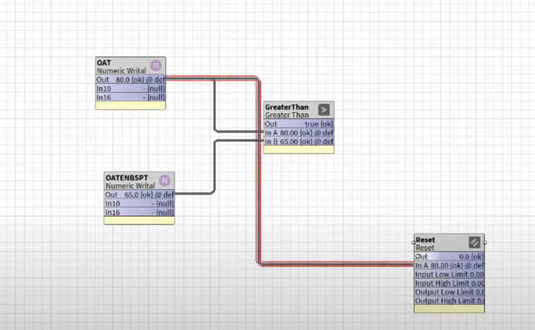
All right, so we start with logic. My greater than block will go up to the right and I'm going to create two numeric writables. One I'm going to call the process variable of OAT, and the other is going to be a numeric writable, and I'm going to call this OAT enable setpoint. Can you tell I used to work at Johnson Controls?
Alright, so I would do outside air temp, and for simplicity's sake, I’m going to set it at 80 and my enable setpoint here, I'm going to make this 65. We can see I am getting a Boolean true coming out of my output. So I have an outdoor air temp, this is an analog. I have my setpoint, this is an analog. This thus enables me to be able to enable all sorts of logic.
So, this would look something like, “When outside air is greater than x, enable economizer; when outside air is greater than x, enable chilled water plant.” So, now what you're seeing is the ability to use this pattern across the board.
It's more than just that. You can do maybe do a trim and response. We have a trim and response sequence, and you will look for calls for cooling or calls for heating. When they exceed a certain point over a time period, you will then gradually go and maybe decrease pressure set point, or maybe you'll decide to increase or decrease temperature.
This brings us to our next design pattern, which is going to be called the reset pattern. Now we've seen reset patterns all over the place, so the reset pattern is another pattern that we use all the time.
When outside air temp is 30, we discharge 180 degrees on our hot water setpoint; when outside air 60, our hot water setpoint for our secondary loop maybe is 140 degrees, and this is an example of a reset. The reset pattern is an additional pattern that is quite easy to do.
So, I can take my outside air temp and I'll have it come in here to my input. Then I can do a hard-set pattern where I actually program them into a block, or I can do an adjustable pattern where I would add variables.
And I would then map these variables in here. For simplicity’s sake, I’m just going to do a hard-set pattern. So, this is going to be a reverse acting reset.
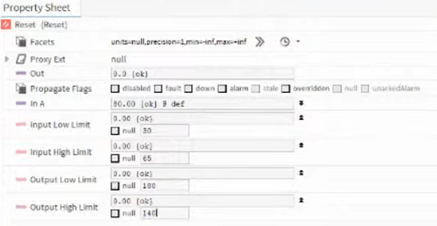
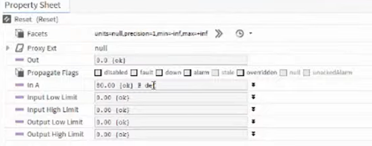
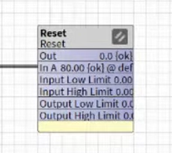
So, I'm going to do Input Low Limit at 30, Input High Limit at 65, Output Low Limit at 180, and Output High Limit at 140. What we should see, is a reset outside.
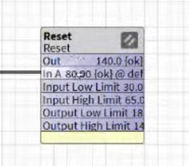
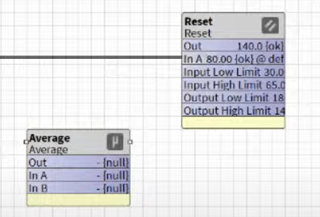
Our reset is taking effect. We have an 80 degree outside air. I mean granted, the hot water system probably shouldn't be on at 80, but for the sake of this example, it is. We could see our reset pattern taking effect, and this is going to handle a ton of different logic situations: chilled water reset, hot water reset, pressure reset based off of maybe average zone damper position. You could also do chilled water reset off of the average valve position.
So, we could literally add an averaging block, and this averaging block could sample from multiple valve positions, and then quite simply be the input to my reset, and that's how we can do an average base reset.
What I hope you're seeing here is that this logic, it's all pattern based. We're going super high level here. In our Programming Course, we go across 28 patterns, and we're only going to cover three patterns here.
So, I did the reset, I did the analog enabled pattern, and now we're going to look at the high select pattern. Many of you have read my Demand Control Ventilation blog and/or listened to that Podcast.
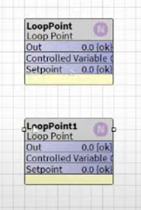
Demand control ventilation. I grab a loop point object, pin my setpoint my control variable, also known as process variable, and we should be good to go. So, this is a PID loop. With demand control ventilation, I can actually do two PID loops. One will drive to mixed air temp, and that's going to be our economizer. The other is going to drive to CO2.
So, let's build out this pattern.
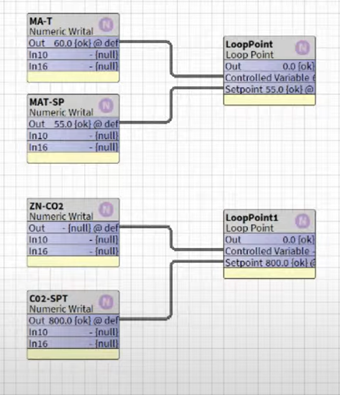
We're going to put a ZN-CO2, and that is going to be my control variable or process variable. I'm going to create a CO2 setpoint, and I'm just going to give this a static value of 800. I'm going to have it go into my setpoint, I have to enable the loop and do a bunch of stuff, but we'll see it in just a second. It all makes sense. Numeric, I'm going to make this MA-T, for my control variable, mixed air temp. Sometimes you drive to discharge air temp on economizer control, sometimes mixed air temp. We're going to make Mixed Air Temp-SP, setpoint. I'm going to set setpoint to 55. I'm going to set mixed air temp to 60.
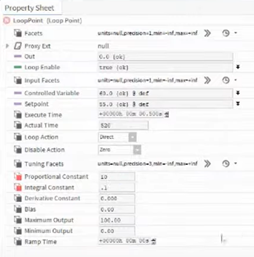
I have direct acting proportional constant, so that should be 10, and then integral constant should be 0.1. That should give us a decent acting loop.
What I'm doing here is I'm creating a high select Pattern, because with CO2 control and mixed air economizer control, my primary concern in this case, is CO2 control for indoor air quality for the occupants, so that we're managing expectations of ASHRAE 62.1. In order to do that, I need to have CO2 controlling the damper and I need to take a high select, so that if my CO2 is higher than the setpoint and that damper starts to open up and it's not being satisfied, it will take that damper command if it's higher than the economizer command.
Now, there's a lot of other stuff you need to put in here, like low limit logic, and fan enable status logic, and whatever, but the pattern remains true, right? Two PID loops and a high select.
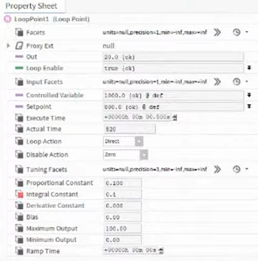
Alright, so we have our setpoint here. ZN-CO2 will be set to 1000.
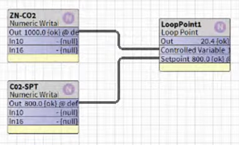
Okay, and then I’m going to go in here and my control range would probably be like 400 to 1400. So, most likely like 1000. 100 divided by 1000 should give me a proportional constant of 0.1. Integral constant should be 0.1.
Then, we're going to gradually see my very slow loop increase. What I need to do next is take a maximum and we’ll have Input A and Input B.
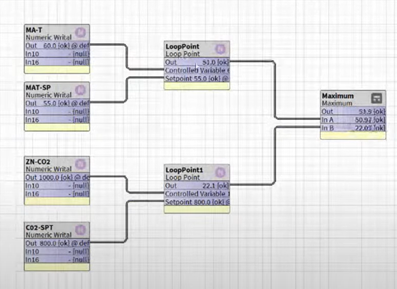
So, this is going to be my high select. Once I enable this loop, we're going to see the high select working, because mixed air temp is much more aggressive. There's much more of an error, which error is the delta, the difference between control variable and setpoint. Because there's a much greater error, we're going to see this loop, which is also a faster loop, because it's got a smaller prop band, is going to actually totalize up much quicker.
But if I were to actually drop this MA-T down to 50, I'm going to shed all of my proportional and my integral pretty quickly, and now we're going to see that the maximum of the CO2 is going up.
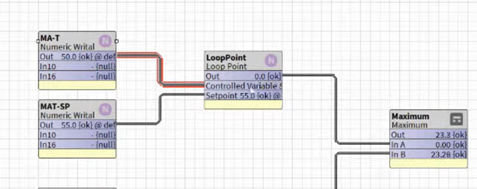
The nice thing about this is you could use this pattern, if you ever had a minimum damper position, you use your point, you use your maximum, and you have your minimum damper position as an adjustable variable going into the maximum block. So, you can see this there as well. This enables you to be able to do a lot of different logic.
Now, I know this seems pretty simplistic, and it should seem simplistic. My challenge to you, as a programmer, or as a building automation technician, or as someone who's teaching BAS tech technicians to program is to try to find the patterns in the HVAC logic. You know, there is not really anything new under the sun with HVAC. Even with Guideline 36, a lot of what is recommended there outside of the analytics aspect of it is pretty much logic that we've been implementing for a long time. We just haven't been doing it on scale due to the data consumption requirements of you know, trim and response, and sampling all these boxes, and valves, and stuff like that.
What I hope you've seen in this post is the ability to identify three common HVAC patterns:
- High Select
- Analog Enable
- Reset Patterns
I hope you understand where that HVAC sequence ties to that logic, and now, there's really about 20-25 patterns, and if you build out those 20-25 patterns, then that's going to enable you to have those patterns, and then you'll have that corresponding to the logic. Then, all you really have to do when you read a sequence to write a program is go through the sequence, look for the logic snippets, the design patterns that match up to those HVAC sequences, and build those patterns in your program, piece the patterns together. Then you've written a program.
This makes programming much easier. It makes it much more intuitive to people who are learning programming.
So, in summary, a lot of people learn programming by going to a products class, and they learn how to use the tool, they learn how to memorize the different types of logic blocks. What they're not taught is how to translate an HVAC sequence into programming logic. So, it is quite easy, but it is a different way of thinking.
If you think about building out a roof truss, or if you think about framing up a house, or if you think about laying out a panel, all of those have patterns to how you do it. You don't reinvent the wheel every time or just throw a bunch of stuff in the panel and hope it works. There's logic to it, like putting transformers on the top, like putting your contacts on the bottom. There's a variety of logical ways that you do these things.
The same is true with programming. We look at the HVAC sequence, we identify patterns, things that happen again and again, like I said, high-low selects, lead lag patterns, things like enable patterns, analog or Boolean enable patterns. Once we identify those patterns, and we're able to build out that programming based on those patterns, then we are able to go and quickly write programs that work, and it makes it much easier.
So, next time you're trying to teach a tech, or maybe you yourself are trying to write a program, I encourage you to consider this approach to look at the sequence, consider what is the pattern here, and what are the corresponding blocks that would enable me to do that pattern and/or line code. We're just doing block because most people do block programming.
Thank you so much for being here. Be sure to check out our free BAS Programming Minicourse, our full BAS Programming Course, and our Programmer Certificate Program.
Thanks so much and take care.

.png)
.png)

