

BAS Hacking 101: Scanning and Enumeration
In the BAS Hacking series I am diving deep into the bowels of building automation networks and systems! I am going to take you through the full process of exploiting a system so that you can better understand the thought process of your attackers. The series consists of 4 articles:
- BAS Hacking 101 Target Selection
- BAS Hacking 101 Scanning
- BAS Hacking 101 Exploiting
- BAS Hacking 101 Clean Up
BAS Hacking 101: Scanning and Enumeration
In this, the second post of my BAS Hacking 101 series, we will discuss:
- Port and Network Scanning
- Traffic Capture
Tools Needed
In this article you will need the following:
- Web browser
- Internet Connection
- Sandboxed Network (For Packet Sniffing)
- (1) BAS Supervisory Device
- Understanding of and the ability to set up private Class C networks and Static IP Addresses.
- Software
- NMAP
- Wireshark
- or
- Kali Linux Distro
Overview
This article will cover the enumeration/scanning step of a penetration test methodology. In this article I will create a local private network from which I will test my BAS device. In this scenario I will be using a device I acquired off of EBay and will not be naming this device as to not expose any security flaws that exist within this device. To that end the MAC address and device names will be obfuscated.
I shouldn't need to note but I will anyways. Scanning someones network without their permission is considered unethical and in some areas is considered a crime. Be sure to have permission prior to doing anything in this series.
Setting The Lab Up
The first thing I need to do is to set up my LAB. First I will pick a Private Subnet (the easiest to work with are Class C subnets because the range is fairly limited). To do this I go to my network settings of my device I will set the device to an IP address on the 192.168.1.0 /24 subnet. If you don't know what a Class C subnet is or how to set your IP address then you should stop reading this article and go study IP networking here. Once your device has its IP address set you will then set your IP address on your NIC.
It is preferable to have dual NIC's so that you can have one NIC set as your private LAN and one set as your network connection. This will allow you to research your findings and dig deeper. Step 1: Set the IP Address of your Device to a Private address, Ideally a Class C subnet. Step 2: Set the IP address of your PC to the same subnet with a different IP address.
Mapping it out with NMAP
NMAP, short for Network Mapping, is a powerful free tool. You can download NMap or its Windows equivalent ZenMap here. Depending on your OS you will need the Windows or Linux version. If you're using Linux it may be quicker to use the APT-Get command in your console. If you are using a Kali Linux distro then NMAP will be on the distro. The first step to NMap is to start NMap.
For simplicity sake I will use ZenMap. It is a GUI version of NMap and allows you to use NMap without memorizing the command line syntax. I highly suggest you learn the syntax and learn the command line as it allows you to have more flexibility with the tool. So, here we go. I click on the ZenMap Icon and I am presented with a series of options.

A couple of key things to call out.
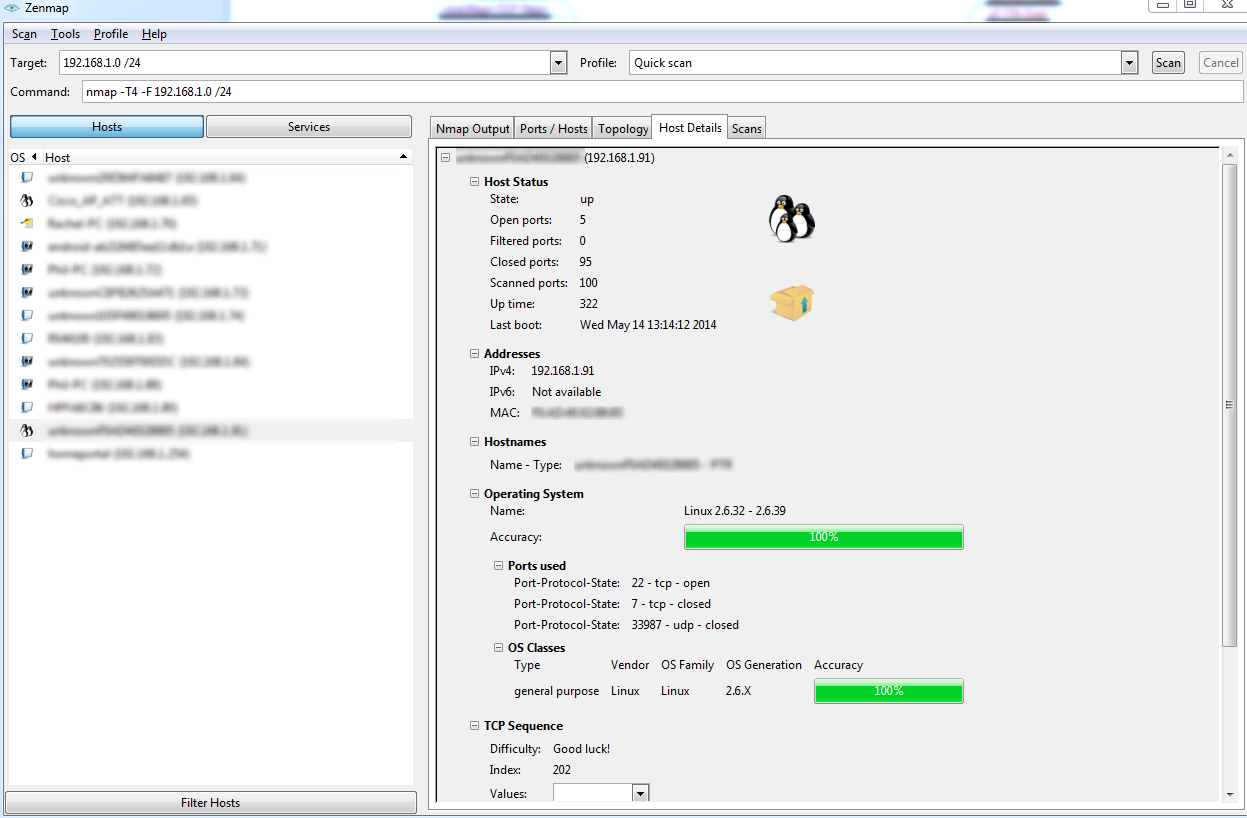
Target: Initially you will want to scan the subnet you believe the device to be on. Using research as mentioned in my previous article you can narrow down public IP addresses and can use that to scan the network. Most likely though you will already know the subnet the device is on and you will perform a scan against that subnet. Notice how I entered the subnet 192.168.1.0 and the appropriate mask /24. This tells NMAP to scan this subnet.
Profile: If you're not concerned about noise you can perform a quick scan. The profile you select set's all your options in the command line below. There are a ton of options see this mind map for further details.
Command: This is where the command's for NMap are entered. Depending on the profile you select the command line will differ. I wanted to first scan my network and find my device. I ran a quick scan and then browsed through the devices that showed up in my host log. The output lists the computer name and IP
Address. 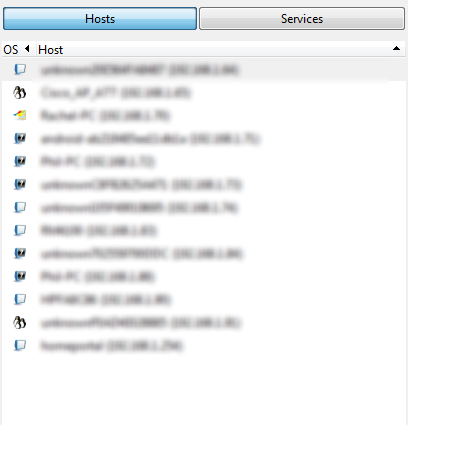
When you select a device the you then have a variety of options to choose from to further understand your device's ports and services.

With this scan you now know the OS, Web Server, Encryption, and Database Structure of the end device, you can proceed to research any weaknesses and exploits associated with this OS. With my OS Version in hand, I googled the OS and sure enough on exploit-db.com there is an exploit taking advantage of a public folder.
The C code essentially takes advantage of a memory buffer overload in order to write malicious code into the system memory. This allows for local privilege escalation, now take into account that this exploit requires local access to the device. You can also see from this initial scan that we only scanned 100 ports. That was because I used the quick scan. In order to map out our attack vectors, we will need to scan all the ports on this device.
Now in a real-world scenario an attacker would be much more cautious than we will be. Next I picked the Intense Scan plus UDP option so that we could cover all of the ports and we could discover any services we missed on our previous run through. UDP is a slow scan so I recommend you only perform this scan once you have found your device.
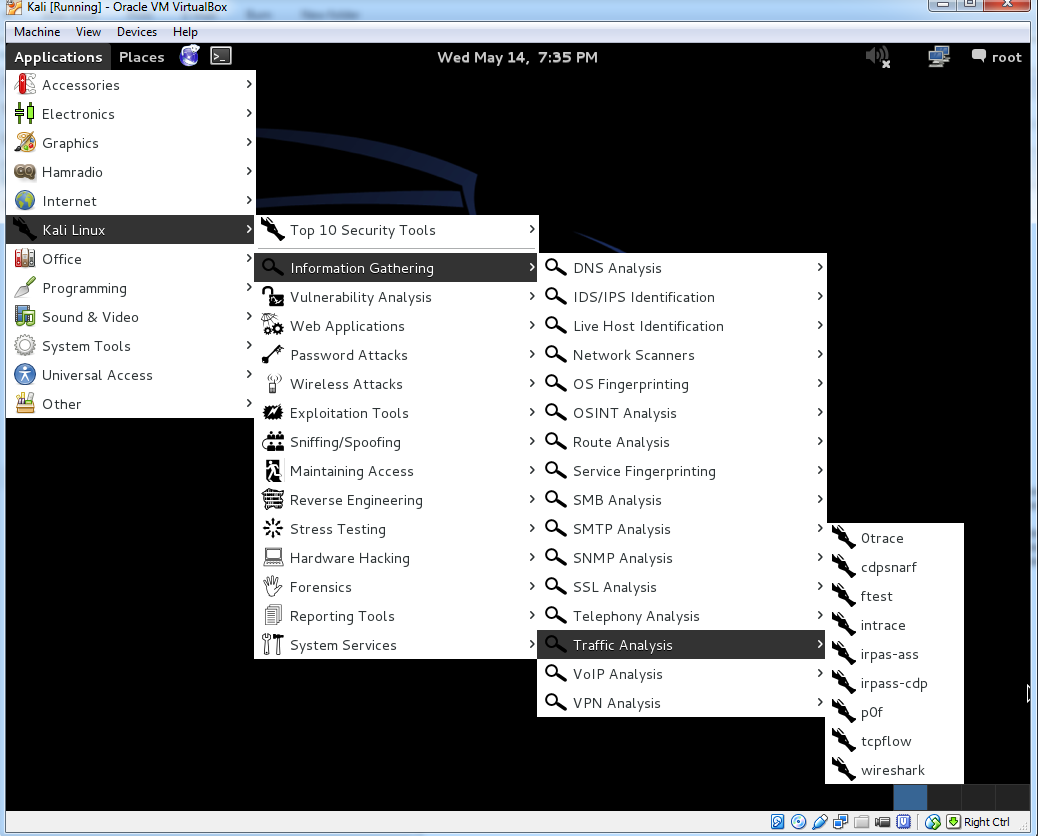
While I wait for the scan to finish I am going to boot up my Kali Linux instance and fire up wireshark. In order to get to wireshark, you will follow the following tree in your Kali Distro (or you can simply download it to your PC) I'm doing my capture in Kali just to show you all what it looks like.
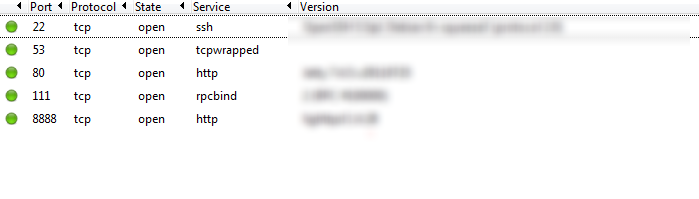
Well, 15 minutes later my Intense plus UDP scan is done and I now have a bit more information on my target. We can now see from the screenshot below that We have a few services and other things to investigate.
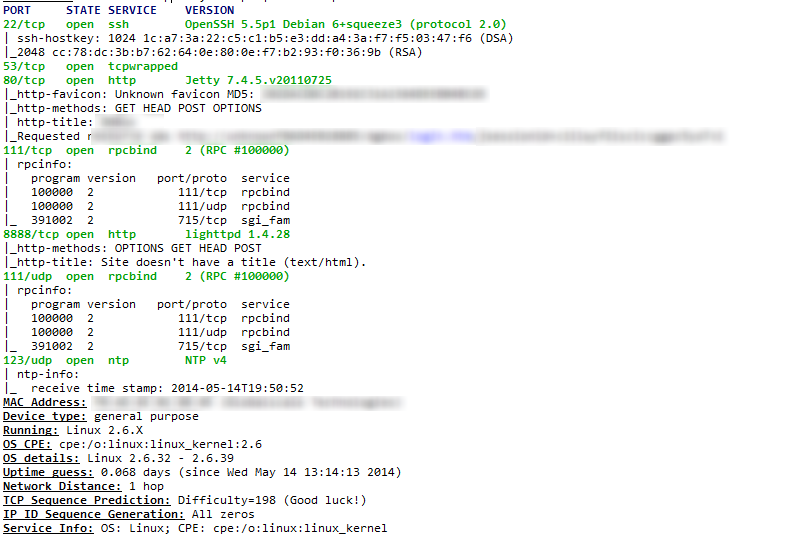
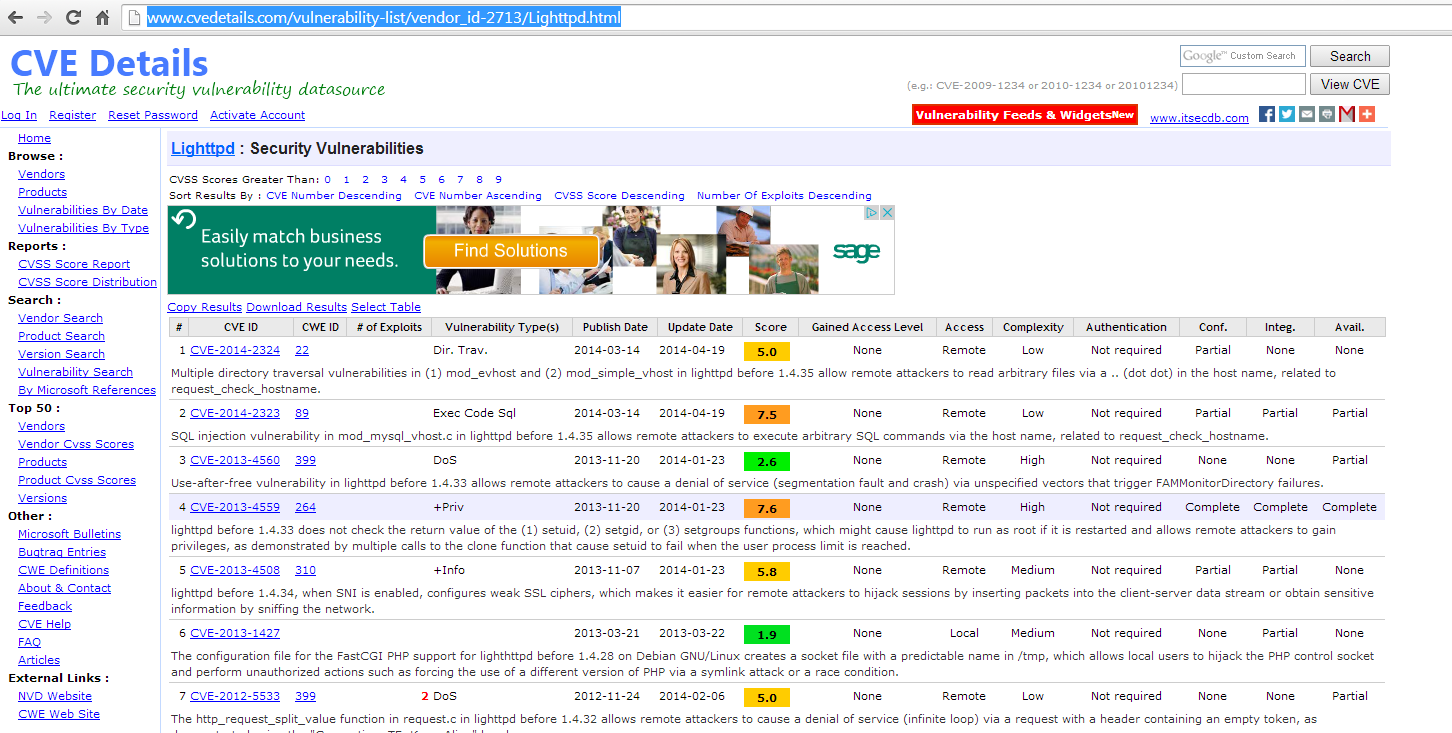
First we need to look into the services, using google we can check what services on a Linux 2.6.39 build we can exploit. We can also check on the Web Server and the Database Server. Using CVE I can see that there are several exploits with the current revision of Lighttpd 1.4.28.
 We will not dig into the exploits and the best way to apply them in this article. We will be creating a list of services we want to explore and then we will create a list of potential exploits we discovered. The services we want to explore are:
- Http Port 80 Jetty V. 7.4.5
- lighttpd V. 1.4.28
- Rpcbind
- Linux OS 2.6.39
- OpenSSH 5.5p1
Packet Capture with Wireshark
Now we are moving on to the network traffic piece. While services are fairly static, network traffic is dynamic. I will be working with the device on a shared subnet, so the traffic will be fairly large. This is good because in a real-world scenario you will often have to pick your devices messaging out of virtual haystack of network traffic. In order to effectively simulate a network sniff. I installed browsed to the device and attempted to login to the device.
The first step is to pick the right network interface and to set that interface in promiscuous mode. This means that the interface device will grab all traffic not just the traffic heading from the local device. In a real-world network you may need to use Cain and Able and apply ARP poisoning against the local switch to ensure that all packets are routed through your sniffer. Obviously this is not a legal thing to do on someone else's network.
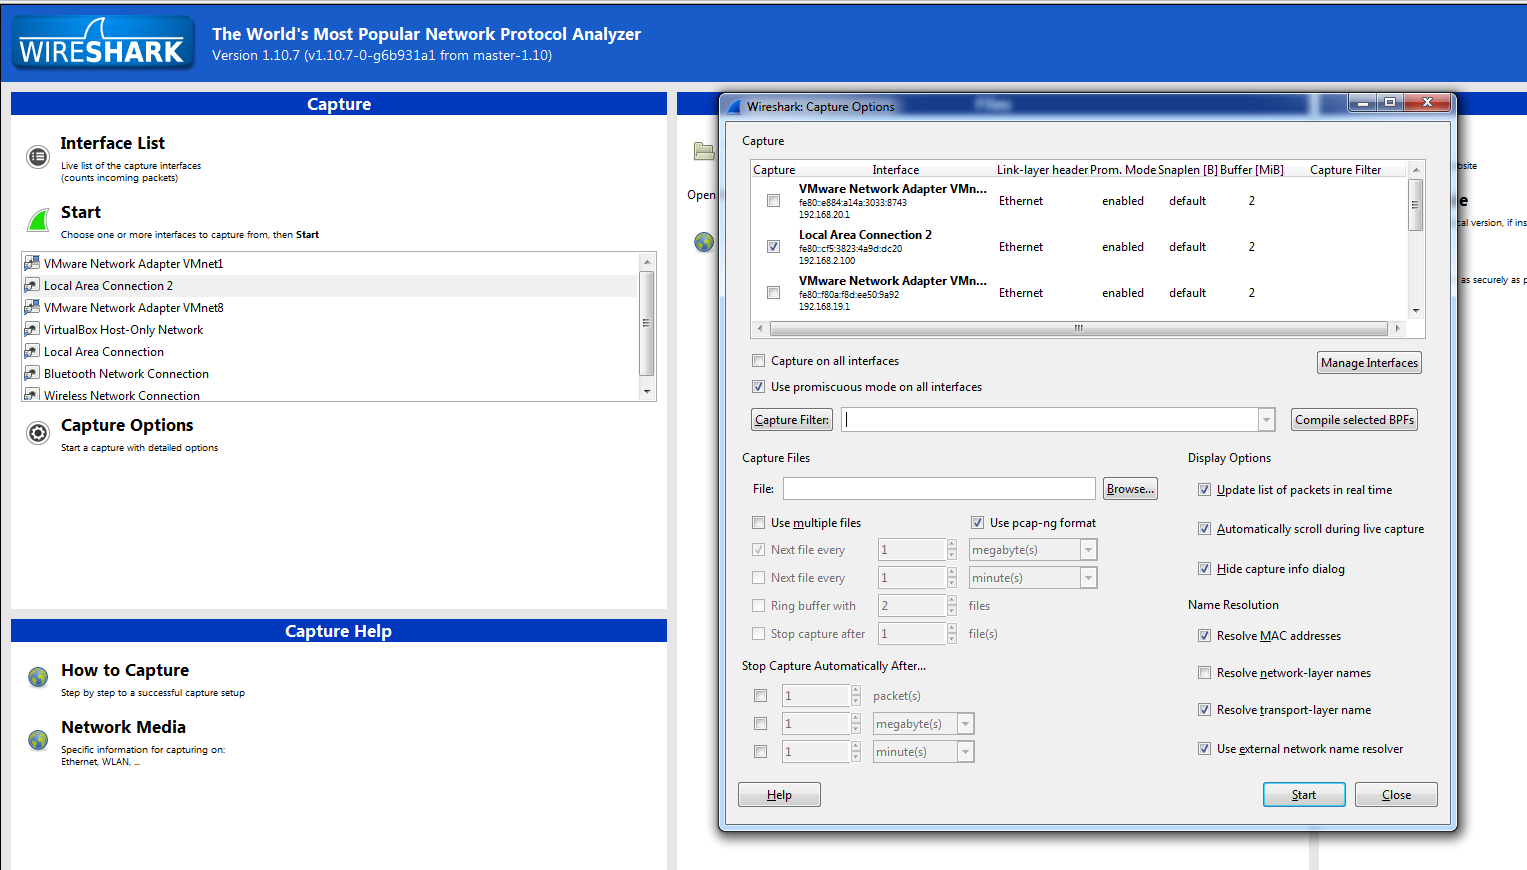
In the diagram above select your interface, select promiscuous mode, and press start. The results were rather disturbing as the packet tracer clearly shows the username and password being passed to the device using an HTTP POST with URL Encoding. What that means for you in laments terms is that when I performing a GET request against the devices URL the web server provides me with the web page.
I then am prompted to login. My response is to enter the username and password into the Form and then POST the form back to the web server. Instead of using a HTTPS connection and encrypting the traffic my POST response is sent via HTTP in clear text. Worse yet it is simply a parameter that is added on to the end of the URL during my POST response.
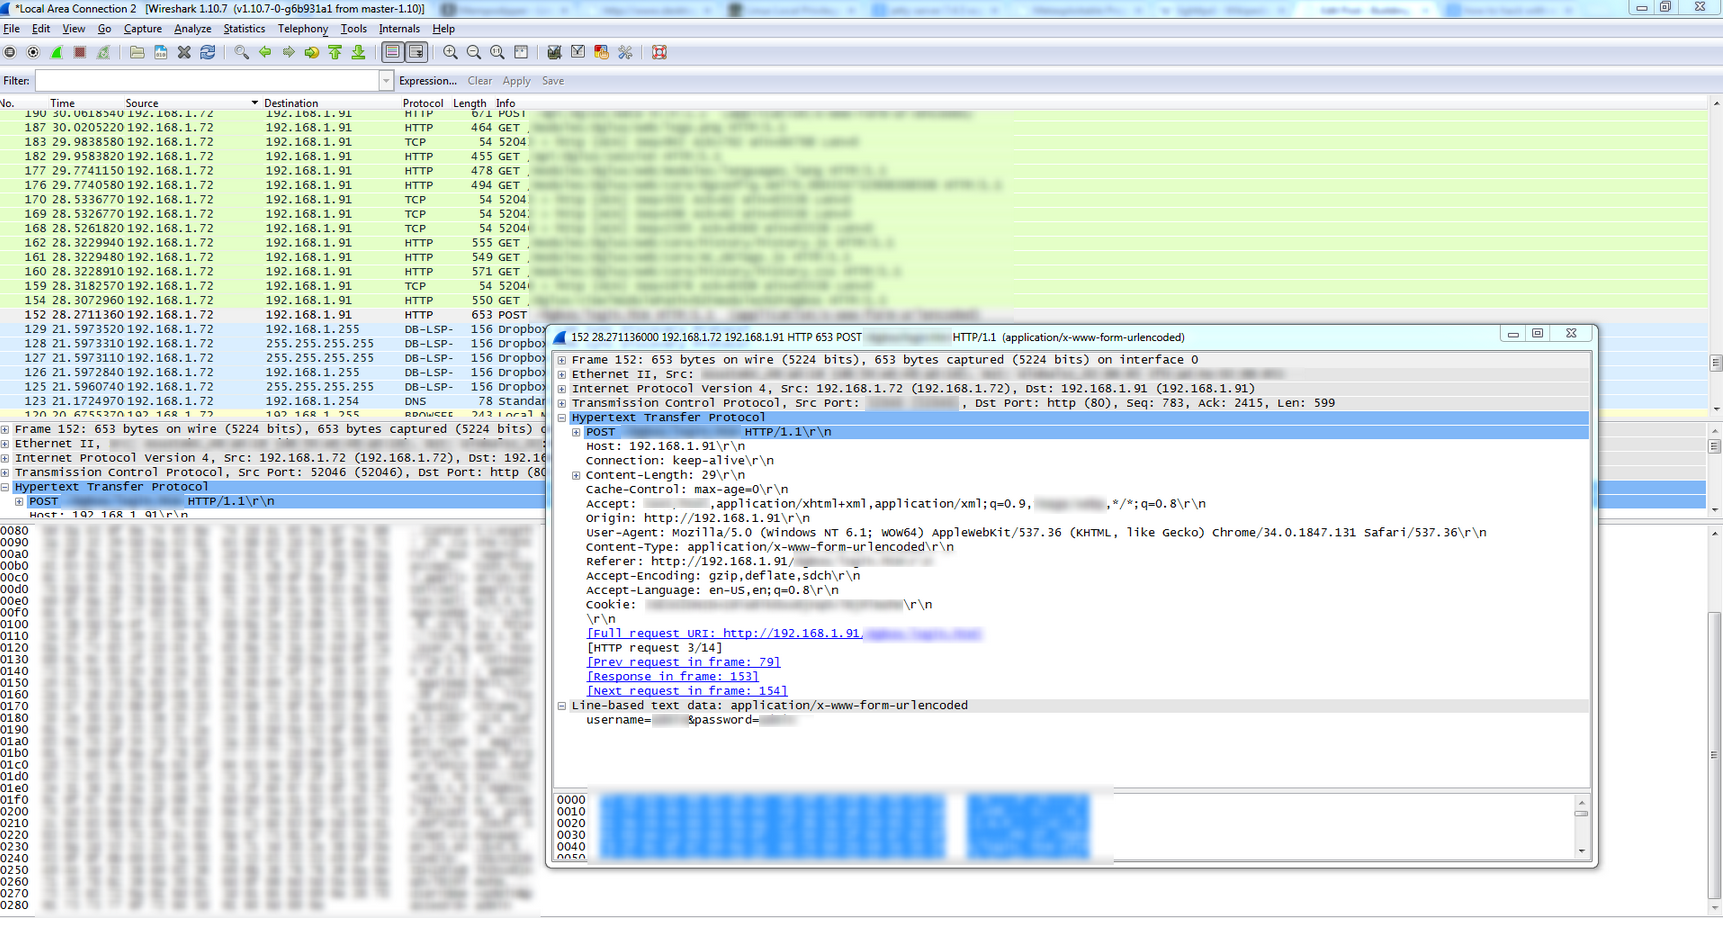
If I was trying to penetrate this system, I would have accomplished my task by simply sniffing the network. Some will say that this is not feasible, I however, cannot count the number of times a BAS was put onto a public wifi in order to allow the facilities guys the ability to connect to the BAS from their phone or laptops. I would simply need to sniff the network and then like magic I have the credentials. You can see the end result of the capture below:
Documenting in the Log
Documentation is the key to success. I am performing this test over a series of months. I need proper documentation in order to ensure I remember the steps I took and that others can repeat this steps. At the end of this series I will include the template that I am using to properly document my steps and my process as I move through exploiting the device.
Conclusion
Most of what I have done in this article could have been easily done using a vulnerability scanner like Nessus, or QualysGuard. The thing is by using those scanners you really don't learn the why or how of what you are looking for.
If you are experienced at Pentesting then it is acceptable to use a vulnerability scanner and an exploit builder like metasploit. If you are new I encourage you to follow through the steps and learn the why and how of testing BAS devices.
In the next article, I will begin two things. First I will research and document my exploits. I will show you where to go and how to research exploits. Next I will use a web proxy to see if I can crawl the web server, interrupt traffic, or capture any other good sources of information.
So are you following the series? Is this helping you to understand how your systems are targeted and exploited?
Share your thoughts and questions below!